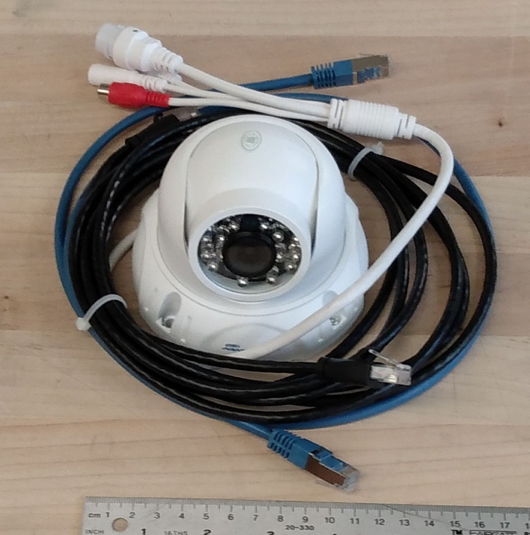
Figure: Telemetry-Compatible Webcam (TCW1B). The camera itself is manufactured by MicroSeven. We supply the camera with a short, shielded network cable and a long, unshielded netrok cable.
[11-DEC-23] Telemetry-Compatible Webcams (TCWs) are an alternative to our Animal Cage Cameras (ACCs). Instead of buying the ACC from us, you buy TCWs on the consumer market. A TCW is any webcam that satisfies two conditions: it runs off true Power over Ethernet (PoE) and it does not disrupt our telemetry system. By "true" PoE we mean industry-standard 48-V PoE with load detection and all the other features stiplated by the industry standard. By "does not disrupt" we mean it does not interfere with reception of wireless messages nor induce artifact in biopotential signals.
| Manufacturer | Part Number | Description |
|---|---|---|
| MicroSeven | M7D77-POE | Infrared lights, 150°, H264, 2MPixel, available. |
| MicroSeven | M7D5MP-POESA | Infrared lights, 150°, H264, 5 MPixel, available. |
| MicroSeven | M7D4K-POESA | Infrared lights, 150°, H264, 8 MPixel, available. |
Although the TCW is a fraction of the cost of an ACC, it suffers from three significant disadvantages with respect to the ACC.
Commercially-available webcams can distrupt reception of our subcutaneous transmitter (SCT) signals. Our TCW cameras are models we have tested with our SCT system, and for which we have measured microwave power radiation with our own instruments.
We guarantee that they will not disturb your SCT recordings. But we will not sell these cameras to you directly: you must buy them yourself so that you can obtain support directly from their manufacturer.

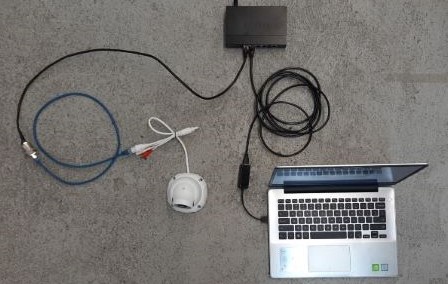
All TCWs require only one Ethernet cable for power and communication. We can connect multiple TCWs to the same PoE switch as our telemetry receivers and data acquisition computer.
You will need two network cables: one to run from the PoE switch to a feedthrough in the Faraday enclosure, and another to run from the feedthrough to the camera within the enclosure. The TCW is a Power-over-Ethernet (PoE) webcam. It requires only one Ethernet cable connection for power and communication. We place the camera inside a Faraday enclosure and connect it to an Ethernet feedthrough in the enclosure wall. In the photograph below we see a free-hanging Ethernet feedthrough connecting the blue and black Ethernet cables that make the connection between the PoE switch and the webcam.
We recommend an unshielded cable from the PoE switch to the Ethernet feedthrough, then a shielded cable from the feedthrough to the cable provided by the camera. The shielded cable within the enclosure is necessary to minimise the transmission of noise by the Ethernet signals, which can otherwise disturb reception of our telemetry signals. The unshielded cable from the Faraday enclosure wall to the PoE switch guarantees that there will be no ground loops created by the various webcam cables. If you use a shielded cable instead of an unshielded cable, it is unlikely you will experience any problems with ground loops, but it is possible. If you have only shielded cables, use them, and if you find the cameras are rebooting themselves, or stalling, every now and then, buy some unshielded cables and try them instead.
Note: We provide the following software installation and setup notes for your convenience. If you have any trouble setting up your TCW, feel free to ask us for help, but we will most likely refer you to the manufacturer for customer support.
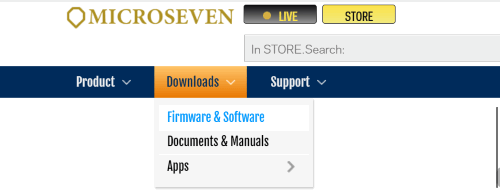
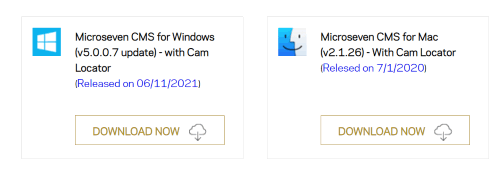
To install your MicroSeven Webcam software navigate to MicroSeven.com hover over downloads and click on firmware and software. Then click on the correct version for your computer, it runs on either Windows or MacOS. The exact files to download are shown below. Once you have downloaded the software, setup the camera using the hardware instructions in this manual.
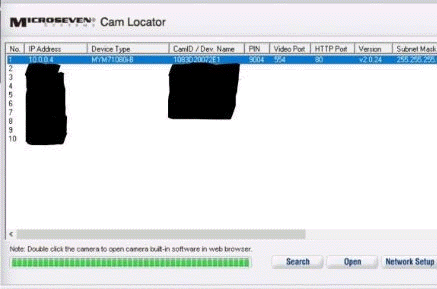
Once you have your computer and TCW hardware properly set-up, open the camera locator application that you downloaded. Press search and locate your device and the device ID. The camera should appear in the locator. The device type will always start with MYM7, you can try to open the camera by double clicking on the device in the cam locator. This will most likely not work as your computer needs to be configured to communicate with the camera via TCP/IP. If it does enter the username and password which have the default setting of Username-admin password=password respectively. If it does not, go to the respective TCP/IP configuration manual below for your respective OS.
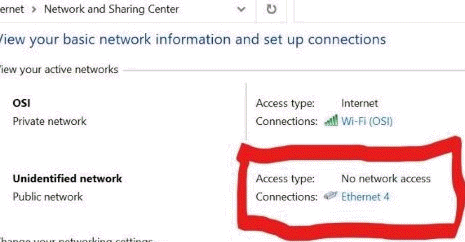
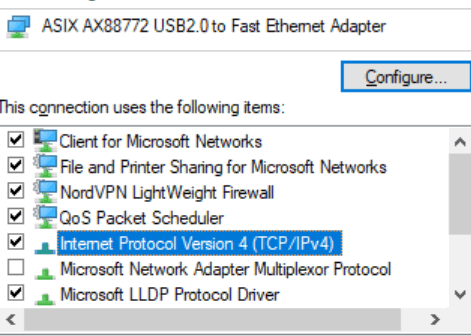
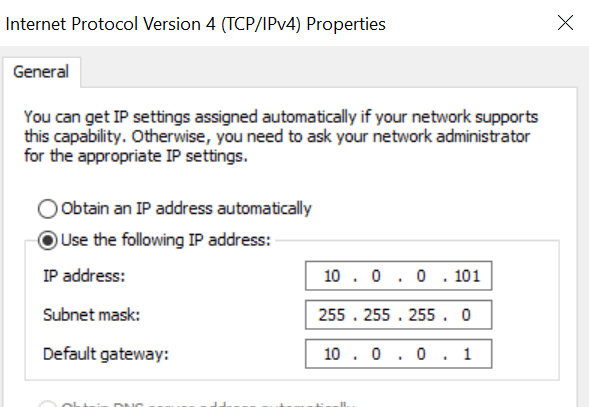
Here are the configuration settings for Windows to enable TCP/IP communication. Go to Control Panel --> Network and Internet --> Network and Sharing Center. Once there you should see an Ethernet connection along with any other internet connections. Click on the new Ethernet connection and click on properties and then (TCP/IPv4).
Once there set the network to a 10.0.0 subnet, which should be the same net as the camera. The Cam Locator will state the device IP address and thus the subnet the device is on. Set the computers IP to any number on the 10.0.0 subnet, for example 10.0.0.57 or 10.0.0.24. Do not set the computer IP to the same number as the device ID. Set the subnet mask and default gateway values to the ones shown below.
Go back to the Cam Locator, double click on the device and a page should open in your web browser. A prompt will appear to enter a username and password. The default username will be Admin and the Password will be password. Once entered succesfully, click live view and a window with the camera view should appear. Software setup complete!
Here are the configuration settings for MacOX to enable TCP/IP communication. Go to System Preferences -> Network. From here we are going to change the location from Automatic. If you have never used our system by PoE than you will have to create a new network location by going to edit location and then pressing the + button.

In this new location select Thunderbird Ethernet and then go to the Configure IPv4 dropdown menu and change it to “Manual”. This should allow you to add an IP Address, Subnet Mask and Router. Put in the below values and then press “Apply” at the bottom of the window.

From there put in the username and password like normal and the camera should be setup. Unfortunately you cannot access the internet while there is a router specified in the Ethernet settings, so once the camera has been found and is set up, delete the router number and apply the settings.
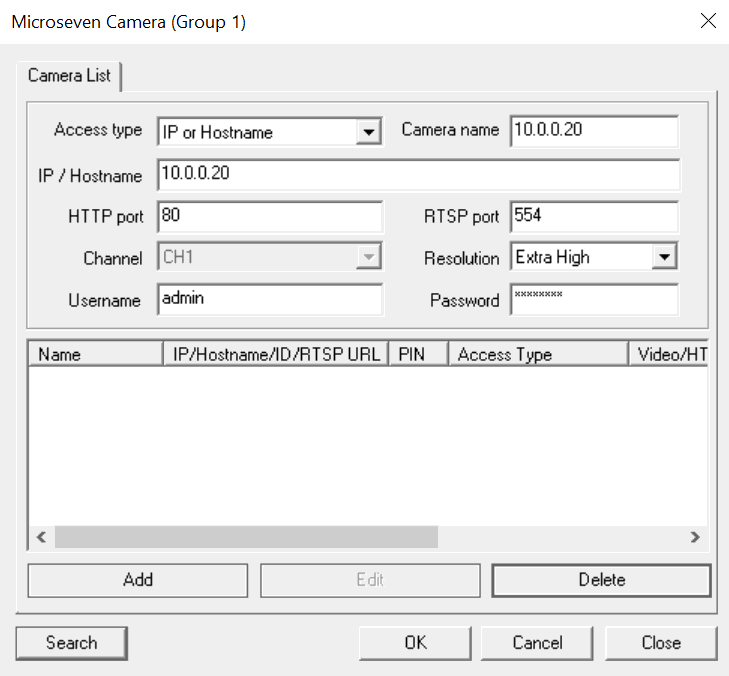
Once your computer has been properly configured, video can recorded. Go to the Microseven camera app and open it up, a black window will open up. Click on Add/Remove Camera on the bottom. A window will open, click on the box access type and change it from CAM ID & Pin to IP or Hostname. Fill in the IP as it is set for you device, an example is shown below. Press ADD then OK and you should see your camera view in the GUI if it is connected correctly. If it is not re-check the IP your camera is set as and try again.
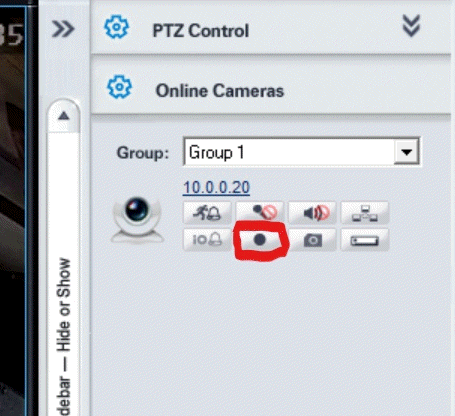
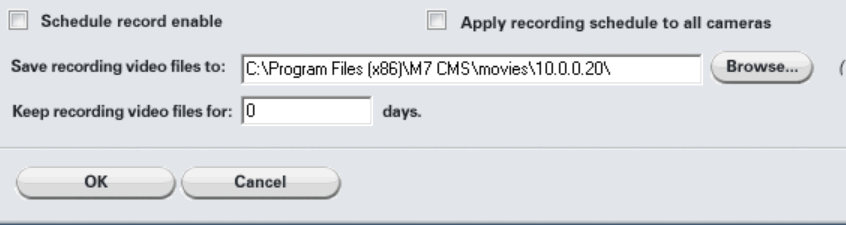
Once video is playing, determine the file location where video will be saved. To change this setting, click on the set schedule button at the bottom right of the GUI and a new window will pop-up. Once the file location for the recording has been set go to the sidebar and click the record button: highlighted below. An MP4 file will appear with a string reading as local computer time in (yyyy/mm/dd/hh/mm/ss) format, at whichever location you have provided.
There is additional functionality, including scheduled recording, motion response recording, as well as a host of other function which can be found on the Microseven homepage.